Prerequisites
Create VPC to launch EC2 instances in.
Create and validate a certificate if you want SSL (HTTPS) for your web application.
Build & Publish Web.UI Solution
Rebuild Solution
- Open your solution that you want to publish in Microsoft Visual Studio 2019 Community.
- Rebuild your solution.
Publish Solution
- Navigate to Build > Publish YourSolutionName.
- Pick a publish target (only if this is the first time you publish your solution):
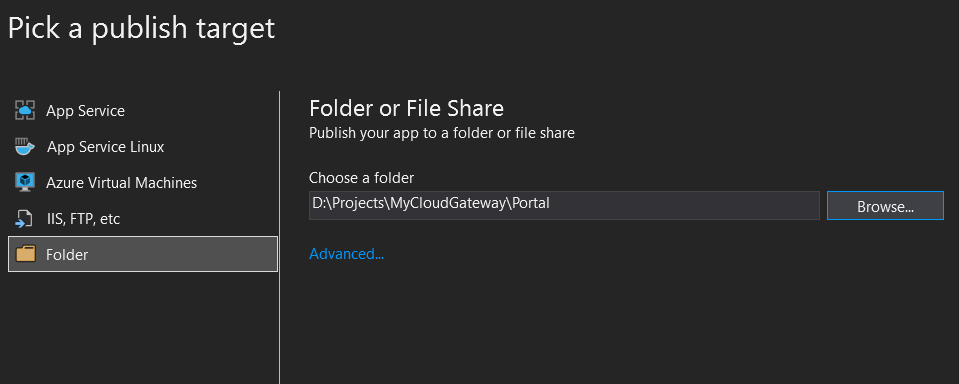
Cloose Folder to publish to and supply your publish folder. (Choose publish folder separate from solution folder so you dont delete your solution accidently!!)
- Click on 'Advanced':
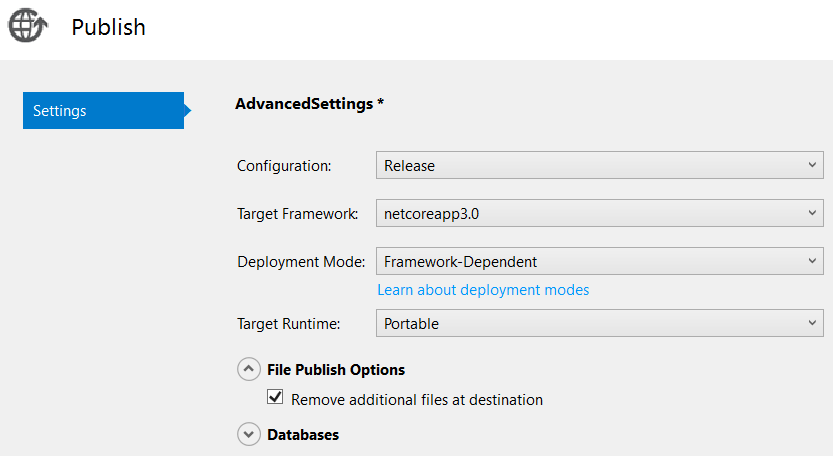
Specify settings as seen above and click 'Save'.
- Click on 'Create Profile'.
- Click on 'Publish'.
Create EC2 Instance
Launch EC2 Instance
- Sign into your AWS Account.
- Navigate to EC2 > Launch instance.
Choose AMI
- Select AMI : Ubuntu Server 18.04 LTS (HVM), SSD Volume Type - 64-bit (x86)
Choose Instance Type
- For DEV & UAT environments choose t2.micro.
- For PROD environment, choose an Instance Type based on your client and application requirements and budget.
Configure Instance
| Configure Instance Details | |
| Number of instances | 1 |
| Network | Select your applicable VPC |
| Subnet | Select a public Subnet with internet access |
| Auto-assign Public IP | Use subnet settings (Enable) |
Add Storage
- For DEV & UAT environments choose Root Volume as General Purpose SSD (gp2) - 8GiB.
- Make sure 'Delete on Termination' is selected and 'Encryption' is set to 'Not Encrypted'.
- For PROD environment, choose a Root Volume Type based on your client and application requirements and budget.
- Add an additional volume based on your client and application requirements and budget.
Add Tags
- Add relevant Tags.
Configure Security Groups
- Select Security Group created for public web instances (G53_SCG_Public_Web).
Review and Launch
- Review all details of your EC2 instance and click 'Launch'
Keypair & Launch
- Select existing key pair or Create a new key pair and Launch Instances.
Connect to EC2 Instance
- Open Ubuntu.

sudo su
cd /mnt/d
cd /YourKeyPairFilePath
cp YourKeyPairFile.pem ~
cd ~
chmod 400 YourKeyPairFile.pem
ssh ubuntu@YourEC2PublicIP -i YourKeyPairFile.pem
Prepare your EC2 Instance for .NET Core
Install Git, Apache and .NET Core
- Open Ubuntu.sudo su lsb_release -a- Use version retrieved above in place of xx.xx in following command that will install dot net.wget -q https://packages.microsoft.com/config/ubuntu/xx.xx/packages-microsoft-prod.deb -O packages-microsoft-prod.deb sudo dpkg -i packages-microsoft-prod.deb- Install the .NET SDK. - Replace x.x with the appropriate .NET Core version.sudo apt-get install apt-transport-https sudo apt-get update sudo apt-get install dotnet-sdk-x.x- Install Apache.sudo apt-get install apache2- Enable the following apache modules.sudo a2enmod ssl sudo a2enmod proxy sudo a2enmod proxy_http sudo a2enmod proxy_html sudo a2enmod headers- Restart apache.sudo systemctl restart apache2- Create a configuration file for your application. - Always replace webappname with the name of your application.sudo nano /etc/apache2/conf-enabled/webappname.conf- Copy the following content to the file:<VirtualHost *:*> RequestHeader set "X-Forwarded-Proto" expr=%{REQUEST_SCHEME} </VirtualHost> <VirtualHost *:80> ProxyPreserveHost On ProxyPass / http://127.0.0.1:5000/ ProxyPassReverse / http://127.0.0.1:5000/ ErrorLog ${APACHE_LOG_DIR}webappname-error.log CustomLog ${APACHE_LOG_DIR}webappname-access.log common </VirtualHost>- Save file by pressing Crtl X, Yes and then Enter. - Restart Apache.sudo systemctl restart apache2- Create a folder for your web application.cd /var/www sudo mkdir webappname cd /var/www/webappname chown -R ubuntu /var/www/webappname chmod -R 755 /var/www/webappname- Logout of your ECC2 instance and open Ubuntu again.sudo su cd /YourKeyPairFilePath sudo scp -r -i YourKeyPairFile.pem /mnt/d/YourPublishFolder/* ubuntu@YourEC2PublicIP:/var/www/webappname- Start a new terminal session and sign into your EC2 instance then create a Kestrel service.sudo su cd /YourKeyPairFilePath ssh ubuntu@YourEC2PublicIP -i YourKeyPairFile.pem sudo su sudo nano /etc/systemd/system/kestrel-webappname.service- Add the following in the file.[Unit] Description="Gateway53 Web App Name" [Service] WorkingDirectory=/var/www/webappname ExecStart=/usr/bin/dotnet /var/www/webappname/webappname.dll Restart=always RestartSec=10 SyslogIdentifier=dotnet-webappname User=root Enviroment=ASPNETCORE_ENVIROMENT=Production [Install] WantedBy=multi-user.target- Save file by pressing Crtl X, Yes and then Enter. - Enable the service you created using:sudo systemctl enable kestrel-webappname.service- Start the service.sudo systemctl start kestrel-webappname.service- Verify that the service is runningsudo systemctl status kestrel-webappname.service- Querying the logs for your servicesudo journalctl -fu kestrel-webappname.service
Load Balancers
- If you want to route a domain name to this EC2, you need to add a Load Balancer infront of your EC2 instance.
Target Groups
Before you can create your Application Load Balancer, you have to create a Target Group that will be used be the ALB.
Navigate to EC2 > LOAD BALANCING > Target Groups > Create target group
| Basic Configuration | |
| Choose a target type | Instances |
| Target Group Name | G53-TRG-Web |
| Protocol |
Use HTTP Port 80 if you are not assigning a certificate to this load balancer HTTPS Port 443 if you are assigning a certificate to this load balancer |
| VPC | VPC containing instances you want to add to this Target Group |
| Health Checks | |
| Health check protocol | Should be the same as chosen at Basic Configuration - Protocol |
| Health check path | / |
Click 'Next'
Select the available instances to add to your Target Group.
Click on 'Create target group'.
Application Load Balancer
Navigate to EC2 > LOAD BALANCING > Load Balancers > Create Load Balancer
Click on 'Create' for 'Application Load Balancer'
| Configure Load Balancer | |
| Basic Configuration | |
| Name | G53-ALB-Web |
| Scheme | internet-facing |
| IP address type | ipv4 |
| Listeners | |
| Load Balancer Protocol | Same as selected for Target Groups |
| Load Balancer Port | Same as selected for Target Groups |
| Availability Zones | |
| VPC | Select subnets for at least 2 AZs |
| Availability Zones | Select your applicable VPC |
| Tags | |
| Configure Security Settings | |
| Select default certificate (only when chosen https) | |
| Certificate Type | Choose a certificate from ACM |
| Certificate name | Choose your certificate |
| Select Security Policy | |
| Security policy | ELBSecurityPolicy-2016-08 |
| Configure Security Groups | |
| Select an existing security group | Public Web (G53-SCG-Public-Web) |
| Configure Routing | |
| Target Group | |
| Target group | Existing target group |
| Name | Select the Target Group you created earlier |
| Target Type | Instance |
| Protocol | HTTPS |
| Port | 443 |
| Health Checks | |
| Protocol | HTTPS |
| Path | / |
| Register Targets | |
| Review | |
Click 'Create'.