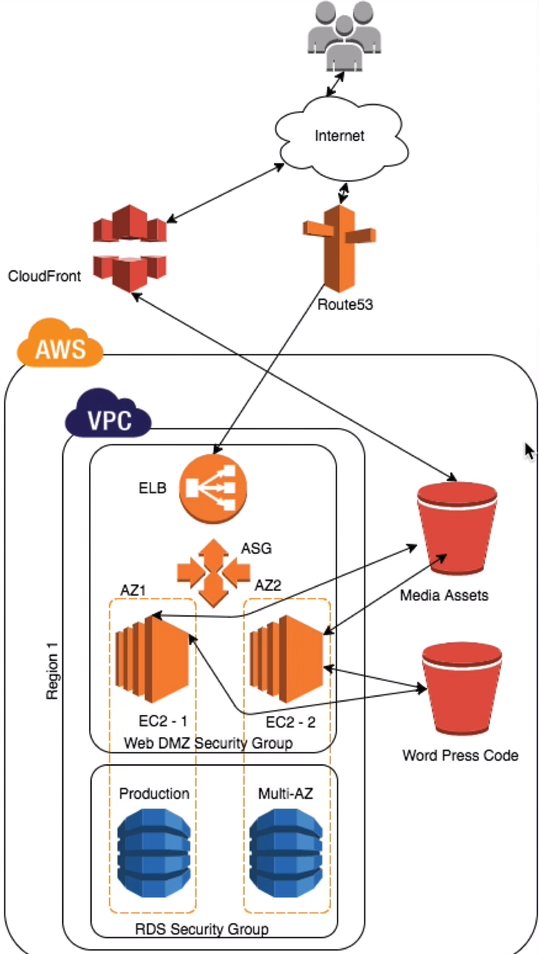
Wordpress Site in AWS
S3 Buckets
- Create new bucket (BucketCode) for Wordpress code in region EU (Ireland).
- Create new bucket (BucketMedia) for Wordpress images in region EU (Ireland).
CloudFront
- Create a new CloudFront Web distribution
| Origin Domain Name | Select (BucketMedia) |
Security Groups
- Create a Web DMZ and RDS security group
Web DMZ
| Inbound Rules |
Type: HTTP - Source: 0.0.0.0/0 Type: HTTP - Source: ::/0 Type: SSH - Source: 0.0.0.0/0 |
RDS
| Inbound Rules |
Type: MySQL/Aurora - Source: Your Web DMZ security group |
RDS Instance
- Create RDS Instance
| Engine options | |
| Engine type | MySQL |
| Templates | |
| Type | Dev/Test |
| Settings | |
| DB Instance identifier | MyRdsDatabaseInstance |
| Master username | MyUsername |
| Master password | MyPassword |
| DB instance size | |
| DB instance class | Burstable classes - db.t2.micro |
| Storage | |
| Storage type | General Purpose (SSD) |
| Allocated storage | 20 |
| Availability & durability | |
| Multi-AZ deployment | Create a standby instance |
| Connectivity | |
| Virtual Private Cloud (VPC) | Select you preferred VPC |
| Additional connectivity configuration | |
| Publicly accessible | No |
| Existing VPC security groups | RDS |
| Additional configuration | |
| Initial database name | MyRdsDatabase |
| Monitoring | Uncheck 'Enable Enhanced monitoring' |
IAM
- Create Role to access S3 from EC2
- Add AmazonS3FullAccess policy to the role.
- Role name: MyEC2S3Role
Launch EC2
- Provision your EC2 instances.
| Configure Instance | |
| IAM Role | MyEC2S3Role |
| Advanced Details | |
| User data |
#!/bin/bash
yum update -y
yum install httpd php php-mysql -y
cd /var/www/html
echo "healthy" > healthy.html
wget https://wordpress.org/wordpress-5.1.1.tar.gz
tar -xzf wordpress-5.1.1.tar.gz
cp -r wordpress/* /var/www/html/
rm -rf wordpress
rm -rf wordpress-5.1.1.tar.gz
chmod -R 755 wp-content
chown -R apache:apache wp-content
wget https://s3.amazonaws.com/bucketforwordpresslab-donotdelete/htaccess.txt
mv htaccess.txt .htaccess
chkconfig httpd on
service httpd start
|
| Configure Security Group | |
| Security Group | Web DMZ |
Test EC2
- Get your public IP addres of your EC2 instance. - SSH into your instance.
sudo su
cd /var/www/html
- Check if htaccess is installed:
cat .htaccessservice httpd status- Click the Lets Go button and complete Wordpress details:
| Database Name | MyRdsDatabase |
| Username | MyUsername |
| Password | MyPassword |
| Database Host | Your RDS endpoint |
| Table Prefix |
- Submit
- You will get a notification page 'Sorry, but I cant write to the wp-config.php file'
- Copy the text in the multi-line textbox.
- Go back to your EC2 terminal, to your html folder
- Create a file (nano) called wp-config.php and copy the text into it
- Go back to your web browser and click 'Run the installation'
- Complete the Welcome details:
| Site Title | My Cloud Gateway |
| Username | MyUsername |
| Password | MyPassword |
| Your Email | Your Email Addresss |
| Search Engine Visibility |
- Install Wordpress
- You should get a Success notification page.
- You can Login using your username and password
- Creata a new post in Wordpress and publish it
- Go back to your EC2 terminal, to your html folder
- Navigate to your uploads for the specified year and month and you will see any images that you have uploaded.
cd wp-content
cd uploads
cd 2020
cd 02
ls
- We will then serve these files (images) from S3 through CloudFront to increade latency.
cd wp-content
cd /var/www/html
aws s3 ls
aws s3 cp --recursive /var/www/html/wp-content/uploads s3://BucketMedia
- Doing this we can use Auto Scaling and when we launch new EC2 instances it can pull the latest code for the website from S3
cd wp-content
cd /var/www/html
aws s3 ls
aws s3 cp --recursive /var/www/html s3://BucketCode
aws s3 ls s3://BucketCode
- Open your htaccess file
- This file contains a URL Rewrite rule and basically allows content (images) to be served from CloudFront and not the EC2 instance.
- You need to edit this file and replace the current CloudFront distribution endpoint with the new one CloudFront Distributions > YourDistribution > General > Domain Name.
- Just make sure our S3 bucket is up to data:
aws s3 sync /var/www/html s3://BucketCode- Navigate to the location where Apache is installed.
cd /etc/httpd
cd conf
cp httpd.conf httpd-copy.conf
nano httpd.conf
service httpd restartS3 Bucket Policy
- Use the followting policy for your S3 Bucket (BucketMedia) Policy
- Make sure to update the arn with yours
{
"Version": "2012-10-17",
"Statement": [
    {
    "Sid": "PublicReadGetObject",
    "Effect": "Allow",
    "Principal": "*",
    "Action": [
        "s3:GetObject"
        ],
    "Resource": [
        "arn:aws:s3:::BUCKET_NAME/*"
        ]
    }
]
}
Application Load Balancer
Navigate to EC2 > LOAD BALANCING > Load Balancers > Create Load Balancer > Application Load Balancer
| Configure Load Balancer | |
| Name | MyALPWP |
| Availability Zones | |
| VPC | Select your VPC and all Availability Zones |
| Configure Security Groups | |
| Select an existing security group | Web DMZ |
| Configure Routing | |
| Target Group | New target group |
| Name | MyWPIntances |
| Health checks : Path | /healthy.html |
| Advanced health check settings : Healthy threshold | 2 |
| Advanced health check settings : Unhealthy threshold | 3 |
| Advanced health check settings : Interval | 6 |
| Register Targets | |
| Instances | Select your EC2 instance |
Route 53
Point our domain to our Application Load Balancer
Navigate to Route 53 > Hosted Zones > Your Hosted Zone > Create Record Set
| Name | Your naked domain name for example gateway53.com |
| Alias | Yes |
| Alias Target | Select your Application Load Balancer |
Place EC2 instances into our Target Group
Navigate to EC2 > LOAD BALANCING > Target Groups > Select your targer group > Targets Tab > Edit > Select EC2 instance > Add to registered
High Availability Architecture
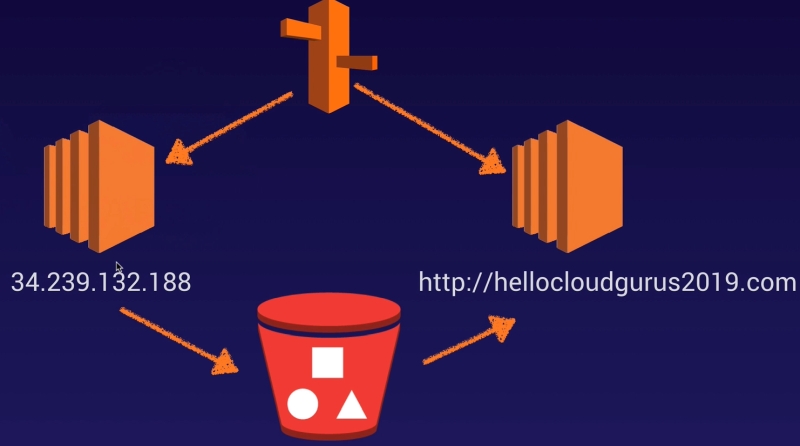
- The EC2 instance 34.239.132.188 is our current EC2 instance
- This instance will be our writer node. Everytime the marketing team writes a new blog they will be navigating directly to this instance.
- This instance will be configured to push any changes to our S3 bucket
- We will have a fleet of EC2 instances that will constantly poll the S3 bucket for changes.
- When people visit our domain Route 53 will redirect them to our fleet (group) of EC2 instances on the right of the picture.
- SSH into you current EC2 instance and go to the etc folder.
- This instance will be our base for all other instances (reader nodes) that will be launched.
- Reader node will scan S3 for any changes and do updates if neccessary.
cd /etc
nano crontab
*/1 * * * * root aws s3 sync --delete s3://BucketCode /var/www/html
Create AMI
Navigate to EC2 > Instances > Select your instance > Actions > Image > Create Image
| Image name | Name of you Image - MyWPReadNode |
| Image description | This is the default read node for WP |
Create Image
Click on your AMIs under IMAGES
Create Writer Node
SSH into your EC2 instance.
We essentially going to change this instance from a reader node to a writer node, as we have a AMI of a reader node already.
sudo su
cd /etc
nano crontab
*/1 * * * * root aws s3 sync --delete /var/www/html s3://BucketCode
*/1 * * * * root aws s3 sync --delete /var/www/html/wp-content/uploads s3://BucketMedia
Save file and then do a test to see if your writer instance is working:
Execute following code in your EC2 terminal and then check if file is in your S3 bucket.
cd /var/www/html
echo "This is a test" > test.txt
service crond restart
service httpd status
Create Auto Scaling Group
- Navigate to EC2 > AUTO SCALING > Launch Configurations > New configuration
- Click on My AMIs under Choose AMI and select your MyWPReadNode AMI
| Configure details | |
| Name | MyWPLC |
| IAM role | MyEC2S3Role |
| Advanced Details - User data |
#!/bin/bash yum update -y aws s3 sync --delete s3://BucketCode /var/www/html |
| Configure Security Group | |
| Select an existing security group | Web DMZ |
| Configure Auto Scaling group details | |
| Group name | MyWP_RN |
| Group size | 2 |
| Network | Select your specified VPC |
| Subnet | Select all the available subnets |
| Advanced Details - Load Balancing |
Check 'Receive traffic from one or more load balancers' Select your target group from Target Groups |
| Advanced Details - Health Check Type | ELB |
| Advanced Details - Health Check Grace Period | 60 |
| Configure scaling policies | |
| Configure Notifications | |
| Configure Tags | |
| Review | |
Remove Write Node
- Navigate to EC2 > LOAD BALANCING > Target Groups > Targets > Edit
- Remove Write node from Registered targets
Surf your Domain